js實現簡單放大鏡效果
用js實現簡單放大鏡效果,供大家參考,具體內容如下
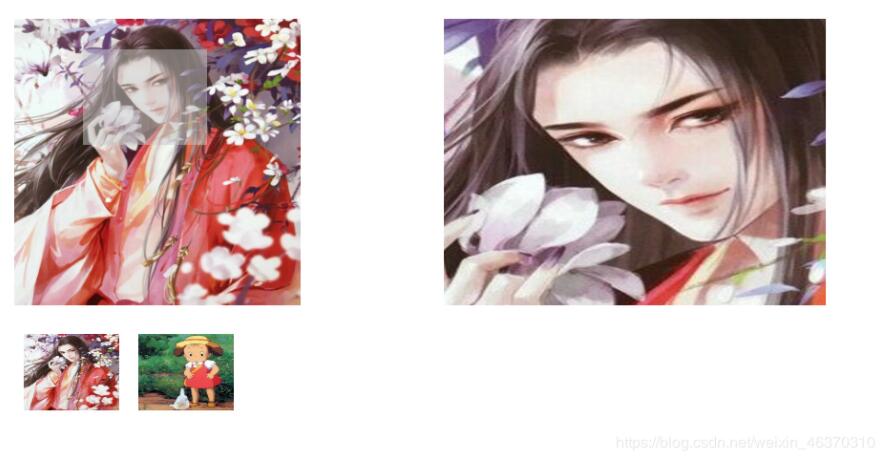
此處放大鏡實現的效果就是當鼠標放置在圖片上會有半透明遮罩,圖片的一個區域就會被放大,然后展示在右邊。當鼠標移動時右邊的大圖片也會局部移動。這里的放大并不是真正的放大,而是等比例移動。下面是實現的代碼:
css樣式代碼如下:
<style> .s_box{width:400px;height: 300px;position: absolute;left: 50px;top:100px;} .s_box img{width: 400px;height: 300px;} .s_box span{width: 130px;height: 100px;background: rgba(200,200,200,0.5);position: absolute;left:0;top:0;display: none;cursor:move;} .b_box{width: 400px;height: 300px;overflow: hidden;position: absolute;left:500px;top:100px;display: none;} .b_box img{width: 1200px;height: 900px;position: absolute;left:0;top:0;} .list{margin: 0;padding: 0;list-style: none;position: absolute;left:50px;top:430px;} .list li{float: left;margin: 0 10px;} .list li img{width: 100px;height: 80px;}</style>
html代碼如下:
<body> <div class='s_box'> <img src='http://www.lshqa.cn/img/large1.jpg' alt=''> <span></span> </div> <div class='b_box'> <img src='http://www.lshqa.cn/img/large1.jpg' alt=''> </div> <ul class='list'> <li><img src='http://www.lshqa.cn/img/large1.jpg' alt=''></li> <li><img src='http://www.lshqa.cn/img/large2.jpg' alt=''></li> </ul></body>
js主要代碼如下:
// 分析:// 1.選擇元素// 2.綁定事件// 3.進入的時候顯示元素// 4.移動:遮罩層跟隨鼠標移動的同時計算遮罩層的移動比例 、右側大圖,等比例移動// 5.離開的時候隱藏元素 <script> class Large{ constructor(){ this.sBox = document.querySelector('.s_box'); this.sImg = document.querySelector('.s_box img'); this.sSpan = document.querySelector('.s_box span'); this.bBox = document.querySelector('.b_box'); this.bImg = document.querySelector('.b_box img'); // 點擊小圖切換大圖的按鈕 this.li = document.querySelectorAll('.list li'); } addEvent(){ var that = this; this.sBox.onmouseover = function(){ that.over(); } this.sBox.onmousemove = function(eve){ var e = eve || window.event; that.move(e); } this.sBox.onmouseout = function(){ that.out(); } // 切換圖片按鈕的點擊事件:根據布局做出調整 for(var i=0;i<this.li.length;i++){ this.li[i].onclick = function(){ that.sImg.src = this.children[0].src; that.bImg.src = this.children[0].src; } } } over(){ this.sSpan.style.display = 'block'; this.bBox.style.display = 'block'; } move(e){ // 計算遮罩層跟隨鼠標移動時的left和top var l = e.pageX - this.sBox.offsetLeft - this.sSpan.offsetWidth/2; var t = e.pageY - this.sBox.offsetTop - this.sSpan.offsetHeight/2; // 邊界限定 if(l<0) l=0; if(t<0) t=0; if(l > this.sBox.offsetWidth - this.sSpan.offsetWidth){ l = this.sBox.offsetWidth - this.sSpan.offsetWidth; } if(t > this.sBox.offsetHeight - this.sSpan.offsetHeight){ t = this.sBox.offsetHeight - this.sSpan.offsetHeight; } // 設置遮罩層的位置 this.sSpan.style.left = l + 'px'; this.sSpan.style.top = t + 'px'; // 根據遮罩層移動的距離計算比例 var x = l / (this.sBox.offsetWidth - this.sSpan.offsetWidth); var y = t / (this.sBox.offsetHeight - this.sSpan.offsetHeight); // 根據上一步得到的比例,計算右側大圖要移動的當前值 this.bImg.style.left = (this.bBox.offsetWidth - this.bImg.offsetWidth) * x + 'px'; this.bImg.style.top = (this.bBox.offsetHeight - this.bImg.offsetHeight) * y + 'px'; } out(){ this.sSpan.style.display = 'none'; this.bBox.style.display = 'none'; } } // 啟動 var l = new Large(); l.addEvent();</script>
實現效果:
更多關于放大鏡的精彩文章,請點擊鏈接查看:《放大鏡效果》
以上就是本文的全部內容,希望對大家的學習有所幫助,也希望大家多多支持好吧啦網。
相關文章:
 網公網安備
網公網安備